Amazon S3 Integration Tutorial
This tutorial guides you through setting up and using the Corsano S3 sync solution, which allows customers to connect their AWS S3 bucket for automatic data synchronization from the Corsano cloud to their storage.
Overview
The Corsano S3 sync solution provides a seamless way to automatically export your study data to your own AWS S3 bucket. This enables you to:
- Maintain full control over your data storage
- Integrate Corsano data with your existing data pipelines
- Automate data processing workflows
- Ensure compliance with data residency requirements
- Scale storage according to your needs
Prerequisites
Before setting up S3 integration, ensure you have:
- Active Corsano Study Portal Account: Access to study.corsano.com
- AWS Account: An active AWS account with appropriate permissions
- S3 Bucket: An existing S3 bucket or the ability to create one
- API Access: Valid API tokens for the Corsano platform
Setting Up S3 Integration
Step 1: Access Integration Settings
- Log into your Corsano Study Portal at study.corsano.com
- Navigate to Settings → Integration tab
- Locate the Amazon S3 section
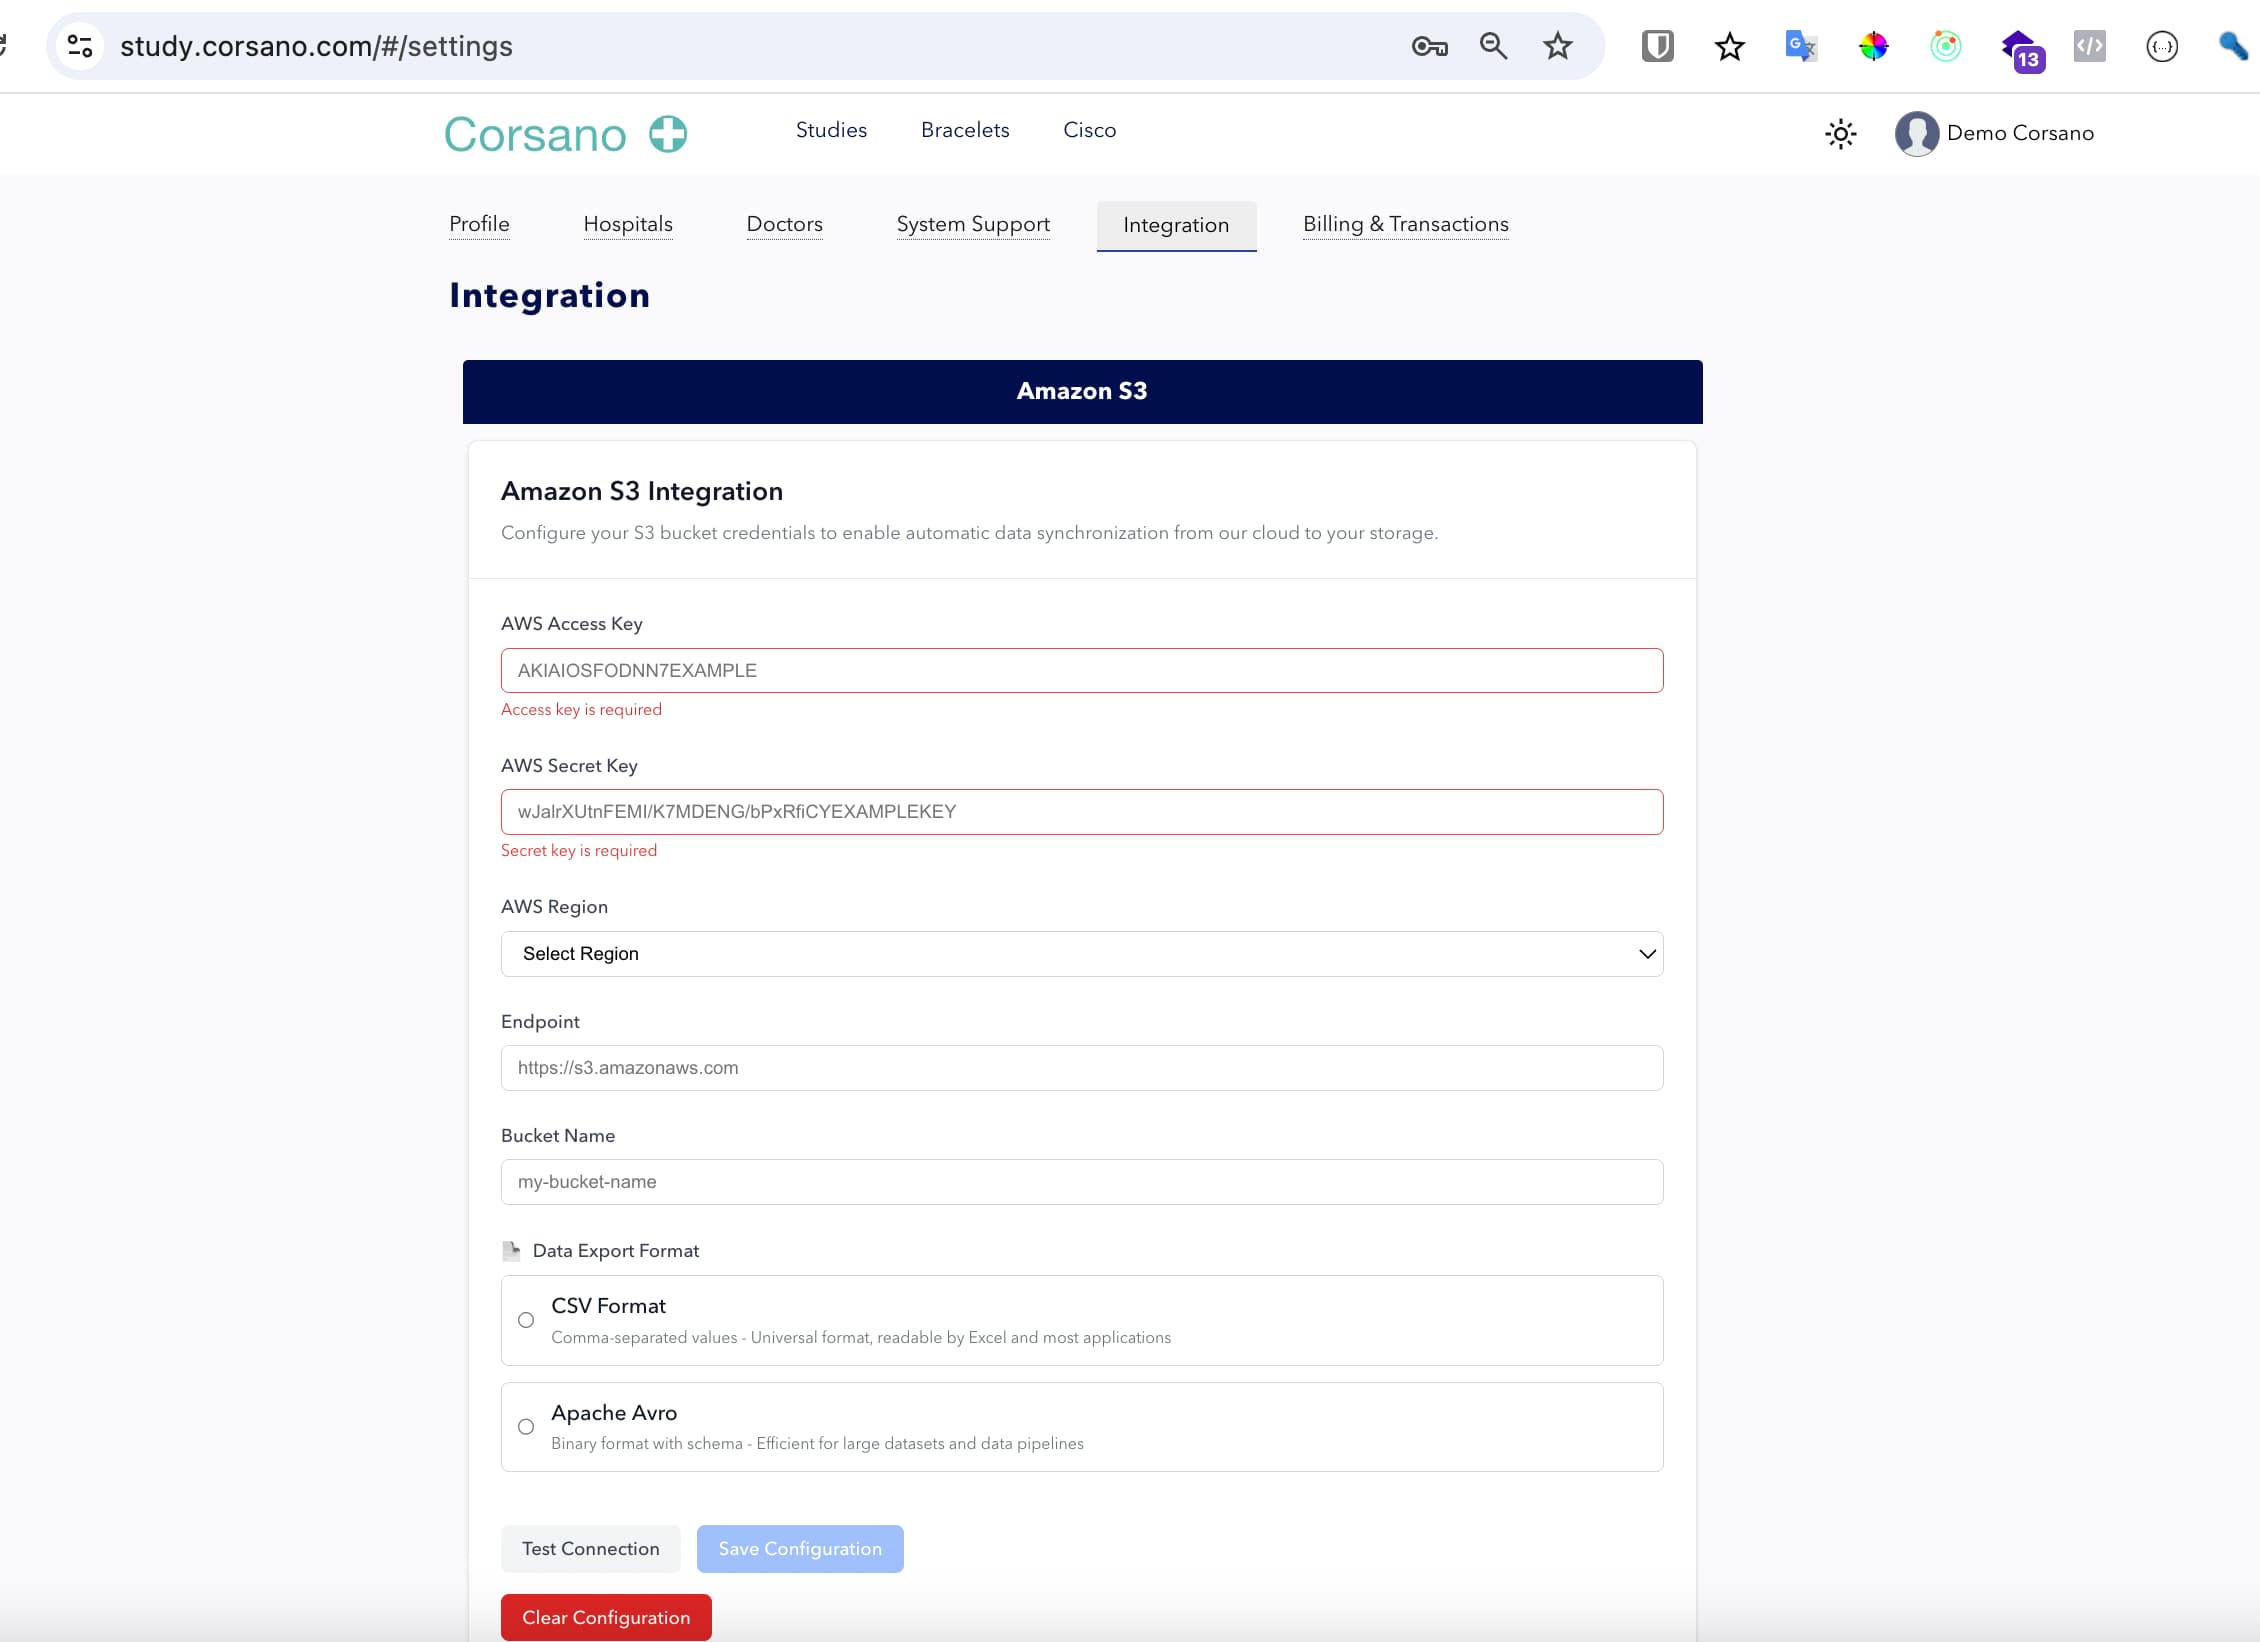
Step 2: Configure S3 Credentials
Fill in the following required fields:
- AWS Access Key: Your AWS access key ID
- AWS Secret Key: Your AWS secret access key
- AWS Region: Select the region where your S3 bucket is located
- Endpoint: The S3 endpoint (default:
https://s3.amazonaws.com) - Bucket Name: The name of your S3 bucket
Step 3: Choose Data Export Format
Select your preferred data export format:
- CSV Format: Universal format readable by Excel and most applications
- Apache Avro: Binary format with schema, efficient for large datasets
Step 4: Required AWS Permissions
The provided access key must have full object manipulation permissions for the specified bucket:
- List bucket contents (
s3:ListBucket) - Get objects (
s3:GetObject,s3:GetObjectVersion) - Put/Upload objects (
s3:PutObject) - Delete objects (
s3:DeleteObject) - Get object metadata (
s3:GetObjectMetadata) - Multipart upload permissions
Integration Test Details
When you click "Test Connection", we'll attempt to create a file named
corsano_testin your S3 bucket to verify permissions.
Step 5: Test and Save Configuration
- Click Test Connection to verify your credentials
- If successful, click Save Configuration to store your settings
- Use Clear Configuration if you need to reset the form
API Integration
Authentication
All API calls require authentication using your researcher API token. Include it as a query parameter:
token=YOUR_RESEARCHER_API_TOKEN
Sync History API
Monitor the synchronization status and history using the sync history endpoint:
curl --request GET \
  --url 'https://public-api.corsano.health/v1/groups/{GROUP_CODE}/sync-history' \
  --header 'accept: application/json' \
  --header 'content-type: application/json'
Parameters
group_code: Your study group identifierchanged_from: Start date for filtering (ISO 8601 format)changed_to: End date for filtering (ISO 8601 format)token: Your researcher API token
Example Request
curl --request GET \
  --url 'https://public-api.corsano.health/v1/groups/EZTJD/sync-history?changed_from=2025-08-07T10%3A00%3A00&changed_to=2025-08-19T22%3A00%3A00&token=YOUR_RESEARCHER_API_TOKEN' \
  --header 'User-Agent: insomnia/11.4.0' \
  --header 'accept: application/json' \
  --header 'content-type: application/json'
Manual Export Trigger API
Trigger a manual export for a specific group, allowing you to re-export data for a specific time range, user, or data types:
curl --request POST \
--url 'https://public-api.corsano.health/v1/s3-sync/continuous-export/{GROUP_CODE}/manual-run?token=YOUR_RESEARCHER_API_TOKEN×tamp_from=1704067200000×tamp_to=1704153600000' \
--header 'accept: application/json' \
--header 'content-type: application/json'
Parameters
| Parameter | Type | Location | Required | Description |
|---|---|---|---|---|
GROUP_CODE | string | path | Yes | Your study group identifier |
token | string | query | Yes | Your researcher API token |
timestamp_from | number | query | No | Start timestamp in milliseconds (Unix epoch) |
timestamp_to | number | query | No | End timestamp in milliseconds (Unix epoch) |
user_uuid | string | query | No | Specific patient UUID to export data for |
types | string | query | No | Comma-separated list of data types to export |
Example Request
# Export all data for a group within a time range
curl --request POST \
--url 'https://public-api.corsano.health/v1/s3-sync/continuous-export/EZTJD/manual-run?token=YOUR_RESEARCHER_API_TOKEN×tamp_from=1704067200000×tamp_to=1704153600000' \
--header 'accept: application/json' \
--header 'content-type: application/json'
# Export data for a specific patient
curl --request POST \
--url 'https://public-api.corsano.health/v1/s3-sync/continuous-export/EZTJD/manual-run?token=YOUR_RESEARCHER_API_TOKEN&user_uuid=abc123-def456×tamp_from=1704067200000×tamp_to=1704153600000' \
--header 'accept: application/json' \
--header 'content-type: application/json'
Use Cases
- Data Recovery: Re-export data that may have failed during automatic sync
- Historical Export: Export data from a specific time period
- Selective Export: Export only specific data types or patients
- Testing: Verify S3 integration is working correctly
Patient Sync Logs API
Retrieve synchronization logs for a specific patient to monitor export activity and troubleshoot issues:
curl --request GET \
  --url 'https://public-api.corsano.health/v1/s3-sync/continuous-export/patients/{USER_UUID}/sync-logs?token=YOUR_RESEARCHER_API_TOKEN' \
  --header 'accept: application/json' \
  --header 'content-type: application/json'
Parameters
| Parameter | Type | Location | Required | Description |
|---|---|---|---|---|
USER_UUID | string | path | Yes | The patient's unique identifier |
token | string | query | Yes | Your researcher API token |
from | number | query | No | Start timestamp in milliseconds (Unix epoch) |
to | number | query | No | End timestamp in milliseconds (Unix epoch) |
limit | number | query | No | Maximum number of log entries to return (default: 100, max: 1000) |
Example Request
# Get recent sync logs for a patient
curl --request GET \
  --url 'https://public-api.corsano.health/v1/s3-sync/continuous-export/patients/abc123-def456-ghi789/sync-logs?token=YOUR_RESEARCHER_API_TOKEN&limit=50' \
  --header 'accept: application/json' \
  --header 'content-type: application/json'

# Get sync logs within a specific time range
curl --request GET \
  --url 'https://public-api.corsano.health/v1/s3-sync/continuous-export/patients/abc123-def456-ghi789/sync-logs?token=YOUR_RESEARCHER_API_TOKEN&from=1704067200000&to=1704153600000&limit=100' \
  --header 'accept: application/json' \
  --header 'content-type: application/json'
Response
Returns an array of sync log entries for the specified patient. Each entry contains details about the synchronization event, including timestamps, status, and any error information.
Use Cases
- Monitoring: Track sync activity for specific patients
- Troubleshooting: Identify failed syncs or issues with data export
- Auditing: Review data export history for compliance purposes
Data Synchronization Process
Automatic Sync
Once configured, the S3 integration automatically:
- Monitors Data Changes: Continuously watches for new or updated data in your study
- Processes Data: Formats data according to your selected export format
- Uploads to S3: Securely transfers data to your specified S3 bucket
- Maintains History: Logs all synchronization activities for audit purposes
Sync Frequency
- Real-time: Data is synced every hour.
- Batch Processing: Large datasets are processed in efficient batches
- Retry Logic: Automatic retry mechanisms for failed uploads
Data Organization
Data is organized in your S3 bucket with the following structure:
your-bucket/
├── group_code_1/
│   ├── patient_uuid_1/
│   │   ├── 2024-01-01/
│   │   │   ├── 00/
│   │   │   │   ├── data_file_1.csv
│   │   │   │   └── data_file_2.csv
│   │   │   ├── 01/
│   │   │   │   └── data_file_3.csv
│   │   │   └── ... (24 hour folders)
│   │   ├── 2024-01-02/
│   │   └── ...
│   ├── patient_uuid_2/
│   └── ...
├── group_code_2/
└── ...
Structure breakdown:
- Root level: Group folders (patient groups)
- Group level: Patient UUID folders
- Patient level: Date folders (YYYY-MM-DD format)
- Date level: 24 hour folders (00-23, UTC timezone)
- Hour level: Data files
Monitoring and Troubleshooting
Common Issues and Solutions
1. Authentication Errors
Problem: "Access denied" or "Invalid credentials" Solution: Verify your AWS access keys and ensure they have S3 permissions
2. Bucket Access Issues
Problem: "Bucket not found" or "Access denied to bucket" Solution:
- Verify bucket name spelling
- Ensure bucket exists in the specified region
- Check bucket permissions and policies
3. Network Connectivity
Problem: "Connection timeout" or "Network error" Solution:
- Check your network connectivity
- Verify firewall settings
- Ensure AWS endpoints are accessible
Security Best Practices
AWS IAM Configuration
Create a dedicated IAM user with the required permissions:
{
  "Version": "2012-10-17",
  "Statement": [
    {
      "Effect": "Allow",
      "Action": [
        "s3:ListBucket",
        "s3:GetObject",
        "s3:GetObjectVersion",
        "s3:PutObject",
        "s3:DeleteObject",
        "s3:GetObjectMetadata"
      ],
      "Resource": [
        "arn:aws:s3:::your-bucket-name",
        "arn:aws:s3:::your-bucket-name/*"
      ]
    }
  ]
}
Data Encryption
- Enable server-side encryption on your S3 bucket
- Use AWS KMS for additional encryption control
- Ensure data is encrypted in transit (HTTPS)
Performance Optimization
Bucket Configuration
- Choose the appropriate S3 storage class for your use case
- Enable S3 Transfer Acceleration for faster uploads
- Use appropriate bucket policies for cost optimization
Data Processing
- Consider using Apache Avro format for large datasets
- Implement data lifecycle policies for cost management
Integration Examples
Python Integration
import requests
from datetime import datetime, timedelta

def get_sync_history(group_code, api_token, days_back=7):
    base_url = "https://public-api.corsano.health/v1"

    # Calculate date range
    end_date = datetime.now()
    start_date = end_date - timedelta(days=days_back)

    # Format dates for API
    start_str = start_date.strftime("%Y-%m-%dT%H:%M:%S")
    end_str = end_date.strftime("%Y-%m-%dT%H:%M:%S")

    url = f"{base_url}/groups/{group_code}/sync-history"
    params = {
        "changed_from": start_str,
        "changed_to": end_str,
        "token": api_token
    }

    headers = {
        "accept": "application/json",
        "content-type": "application/json"
    }

    response = requests.get(url, params=params, headers=headers)
    return response.json()

# Usage
history = get_sync_history("EZTJD", "YOUR_RESEARCHER_API_TOKEN")
print(history)
Node.js Integration
const axios = require('axios');

async function getSyncHistory(groupCode, apiToken, daysBack = 7) {
    const baseUrl = 'https://public-api.corsano.health/v1';

    // Calculate date range
    const endDate = new Date();
    const startDate = new Date(endDate.getTime() - (daysBack * 24 * 60 * 60 * 1000));

    // Format dates for API
    const startStr = startDate.toISOString().split('.')[0];
    const endStr = endDate.toISOString().split('.')[0];

    const url = `${baseUrl}/groups/${groupCode}/sync-history`;
    const params = {
        changed_from: startStr,
        changed_to: endStr,
        token: apiToken
    };

    const headers = {
        'accept': 'application/json',
        'content-type': 'application/json'
    };

    try {
        const response = await axios.get(url, { params, headers });
        return response.data;
    } catch (error) {
        console.error('Error fetching sync history:', error.message);
        throw error;
    }
}

// Usage
getSyncHistory('EZTJD', 'YOUR_RESEARCHER_API_TOKEN')
    .then(history => console.log(history))
    .catch(error => console.error('Failed:', error));
Support and Resources
Getting Help
- Documentation: Refer to the main Corsano API documentation
- Support Portal: Contact support through your study portal
- Community: Join the Corsano developer community
Additional Resources
Conclusion
The Corsano S3 sync solution provides a robust, secure, and efficient way to integrate your study data with your existing AWS infrastructure. By following this tutorial, you can set up automated data synchronization that scales with your needs while maintaining full control over your data storage and processing workflows.
For additional assistance or advanced configuration options, please contact the Corsano support team through your study portal.