Getting Started with Corsano OnPrem
Follow these steps to provision a complete study end-to-end, from service installation through patient onboarding.
Last updated: 2026-10-07
Prerequisites
Hardware & Software
For best results, perform the installation on a fresh Ubuntu host that matches the recommended environment below. Provisioning a dedicated machine avoids conflicts with existing services and keeps the deployment reproducible.
| Item | Recommended | Notes |
|---|---|---|
| Host OS | Ubuntu 22.04 LTS 64-bit | |
| CPU / RAM | 4 physical cores / 8 threads, 16 GiB | |
| Disk | 30 GiB free | Docker images + patient logs |
| Docker Engine | 25.x | Includes Compose v5 plugin |
| Cisco Catalyst 9800-L / -40 / -80 | IOS-XE 17.3+ | |
| Cisco AP | 9100 or 9300 series | |
| Aruba | AOS 10 | The version that is compatible with the OnPrem configuration is currently under review. The app listed in the Aruba app store is compatible with the portal running in the Corsano public cloud. |
Install Docker, Nginx, and supporting tools
On a freshly provisioned host, run the script below to install Docker (with the Compose plugin), Nginx, and the unzip utility. Docker is installed from Docker's official Ubuntu repository, which is the recommended source.
# Update package index
sudo apt-get update

# Install unzip and nginx (in default repos)
sudo apt-get install -y unzip nginx

# Install Docker from Docker's official repo (recommended over Ubuntu's docker.io)
sudo apt-get install -y ca-certificates curl
sudo install -m 0755 -d /etc/apt/keyrings
sudo curl -fsSL https://download.docker.com/linux/ubuntu/gpg -o /etc/apt/keyrings/docker.asc
sudo chmod a+r /etc/apt/keyrings/docker.asc

echo "deb [arch=$(dpkg --print-architecture) signed-by=/etc/apt/keyrings/docker.asc] https://download.docker.com/linux/ubuntu $(. /etc/os-release && echo $VERSION_CODENAME) stable" | \
  sudo tee /etc/apt/sources.list.d/docker.list > /dev/null

sudo apt-get update
sudo apt-get install -y docker-ce docker-ce-cli containerd.io docker-buildx-plugin docker-compose-plugin
1. Create the corsano working directory and fetch the release
The Corsano on-prem files must live in a directory that is operated with root privileges. Use either /root/corsano when running directly as root, or /home/$USER/corsano when running as a regular user with sudo. Create the directory, change into it, then download and unzip the latest release archive (version 0.2.0) from GitLab using the commands below.
sudo mkdir -p /root/corsano
cd /root/corsano
sudo wget https://gitlab.corsano.health/api/v4/projects/1/packages/generic/on-prem/0.2.0/corsano-on-prem-0.2.0.zip
sudo unzip corsano-on-prem-0.2.0.zip
If you use curl instead of wget, download the archive with this command:
sudo curl -LO https://gitlab.corsano.health/api/v4/projects/1/packages/generic/on-prem/0.2.0/corsano-on-prem-0.2.0.zip
Expected directory contents
After extraction, list the directory contents and verify that the following files are present. The start.main.sh script referenced in later steps lives here.
ls -1 /root/corsano /root/corsano/proxy
/root/corsano:
bracelet_types.json
docker-compose.main.yaml
main.env.example
proxy
start.main.sh
stop.main.sh

/root/corsano/proxy:
entrypoint.sh
http.conf.template
https.conf.template
portal.conf
2. Start the Corsano OnPrem service
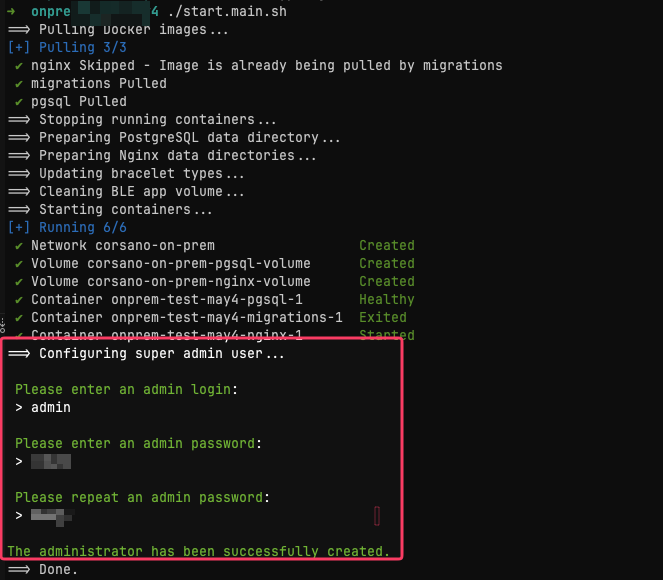
On the host machine, open a terminal and launch the Corsano OnPrem service (backend and web interface) with the command below. Leave the process running before proceeding to the remaining steps. On the first run, the script pulls the required Docker images, starts the containers, and then prompts you to configure the super admin account. You will be asked to provide an admin login, password, and password confirmation. Once completed, the administrator account is created and the service is ready to use.
./start.main.sh
Use self signed certificate
Run these commands in the corsano working directory (for example /root/corsano). They create a self-signed certificate in data/proxy_volume/certs and restart the service with HTTPS.
HOST=corsano.hospital.local   # DNS name that staff type in the browser
IP=10.20.30.40                # optional: server IP

sudo mkdir -p ./data/proxy_volume/certs

sudo openssl req -x509 -nodes -newkey rsa:2048 -days 825 -sha256 \
  -subj "/CN=${HOST}" -addext "subjectAltName=DNS:${HOST}${IP:+,IP:${IP}}" \
  -keyout ./data/proxy_volume/certs/server.key \
  -out ./data/proxy_volume/certs/server.crt

sudo chmod 600 ./data/proxy_volume/certs/server.key

sudo ./start.main.sh
Browsers show a security warning for a self-signed certificate until the certificate is trusted on the device.
3. Sign in with the admin account
Open the web interface in a browser and sign in using the super admin login and password you configured in step 2.

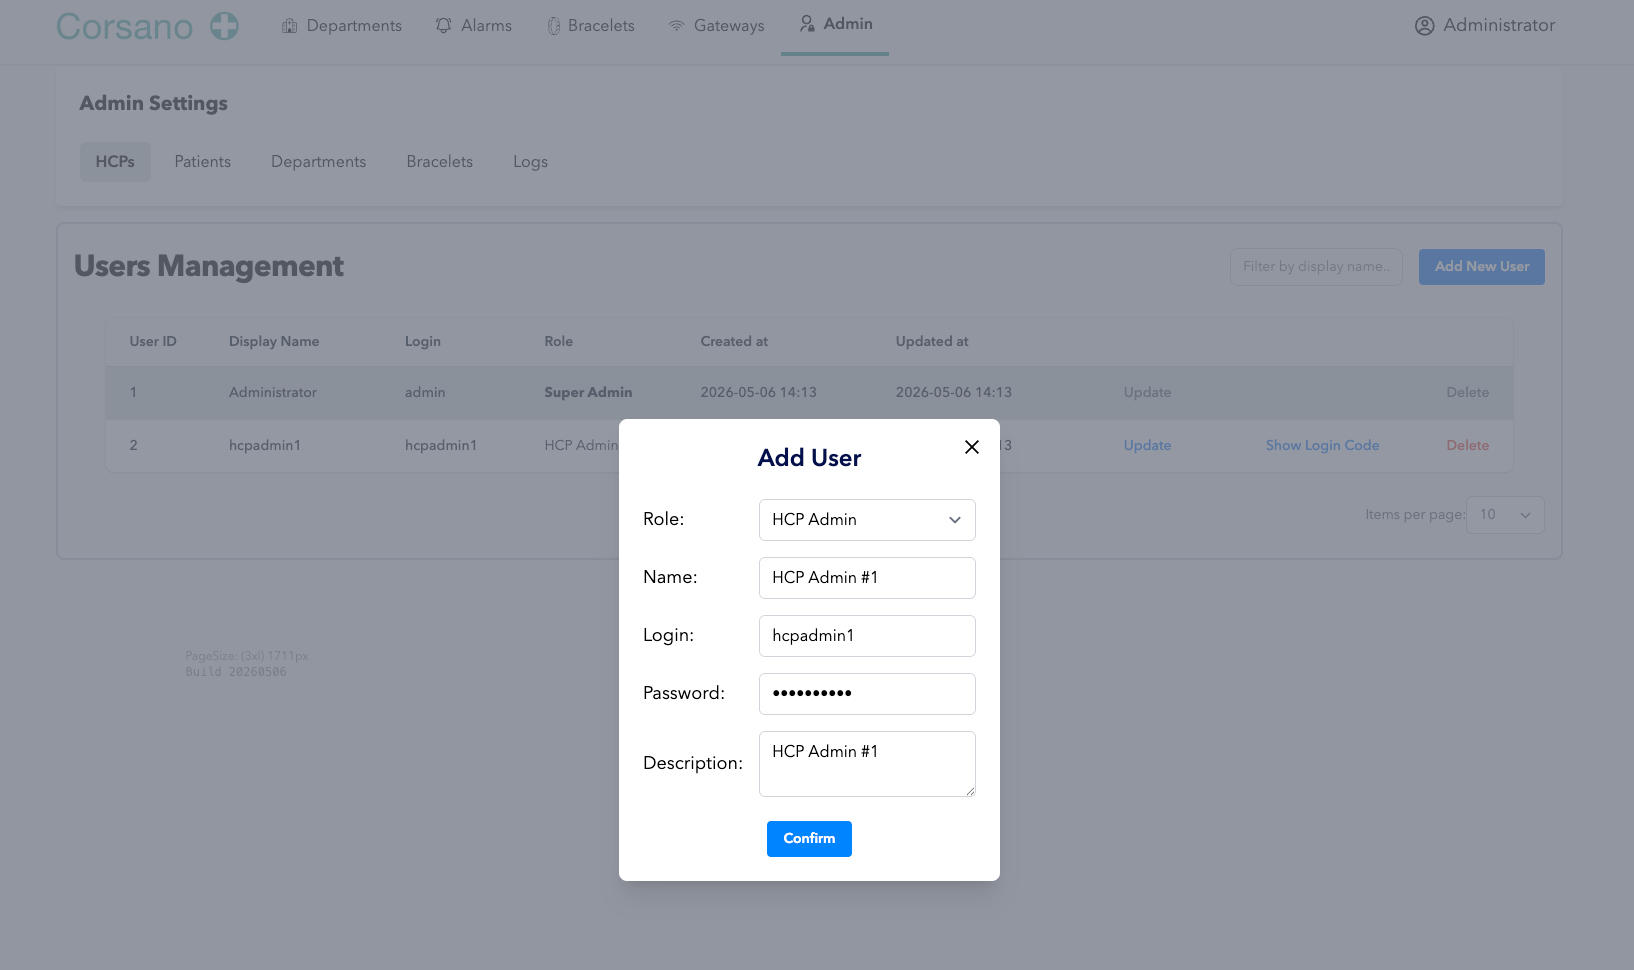
4. Add an HCP Admin
Navigate to Admin Settings → Users Management and create a new user with the HCP Admin role. This account will own and manage one or more studies.
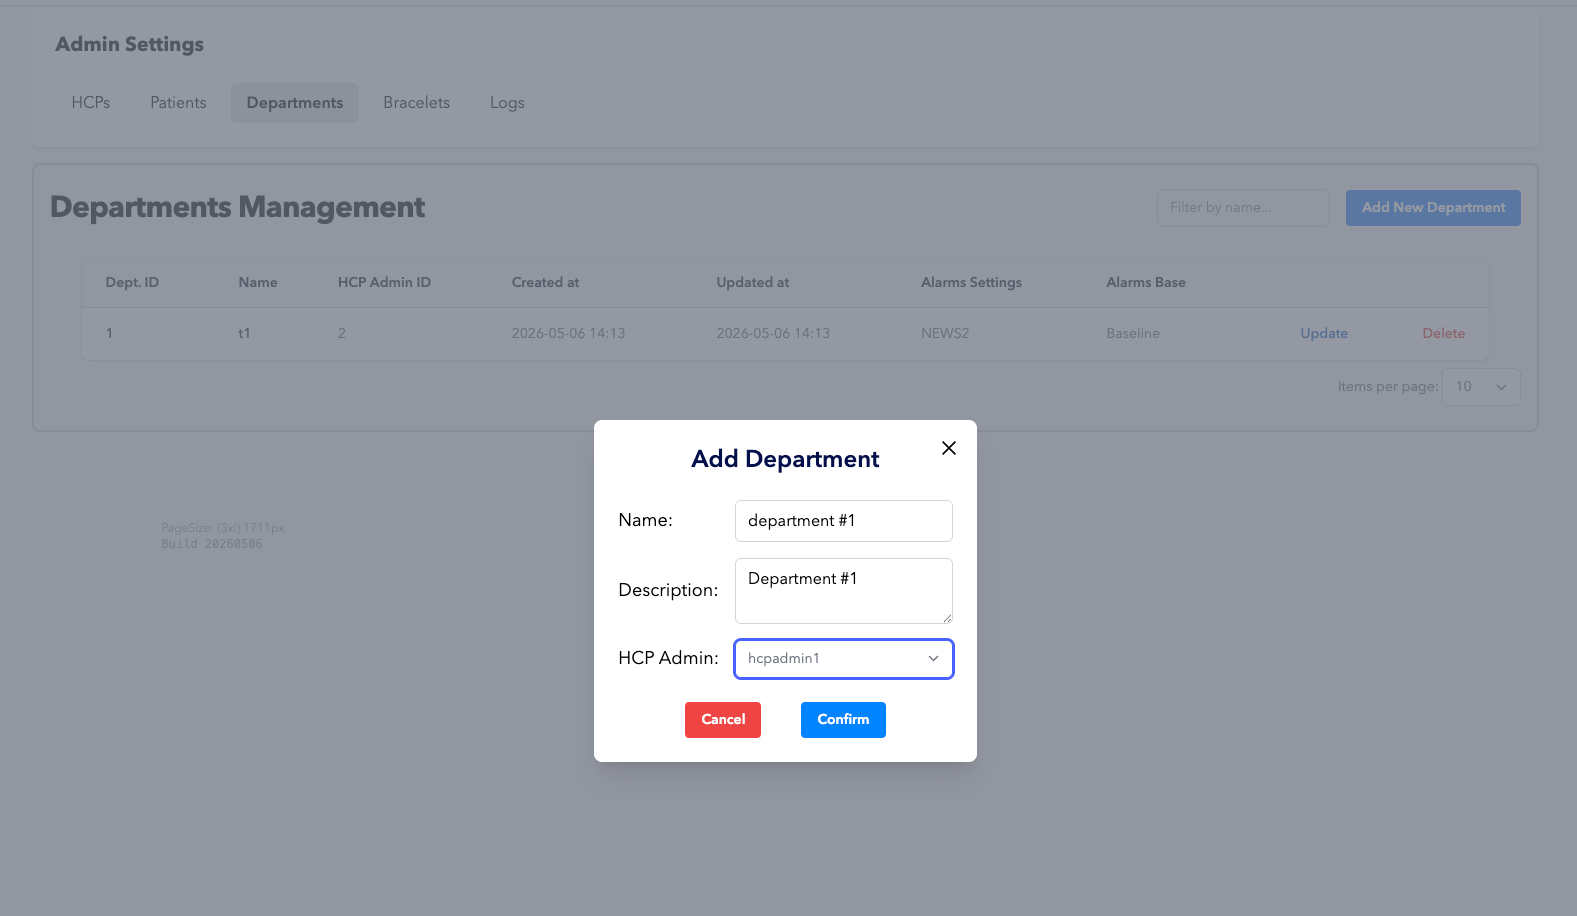
5. Add a Study and assign it to an HCP Admin
Navigate to Admin Settings → Departments, create a new study, and assign the HCP Admin you created earlier so they have authority to administer it.
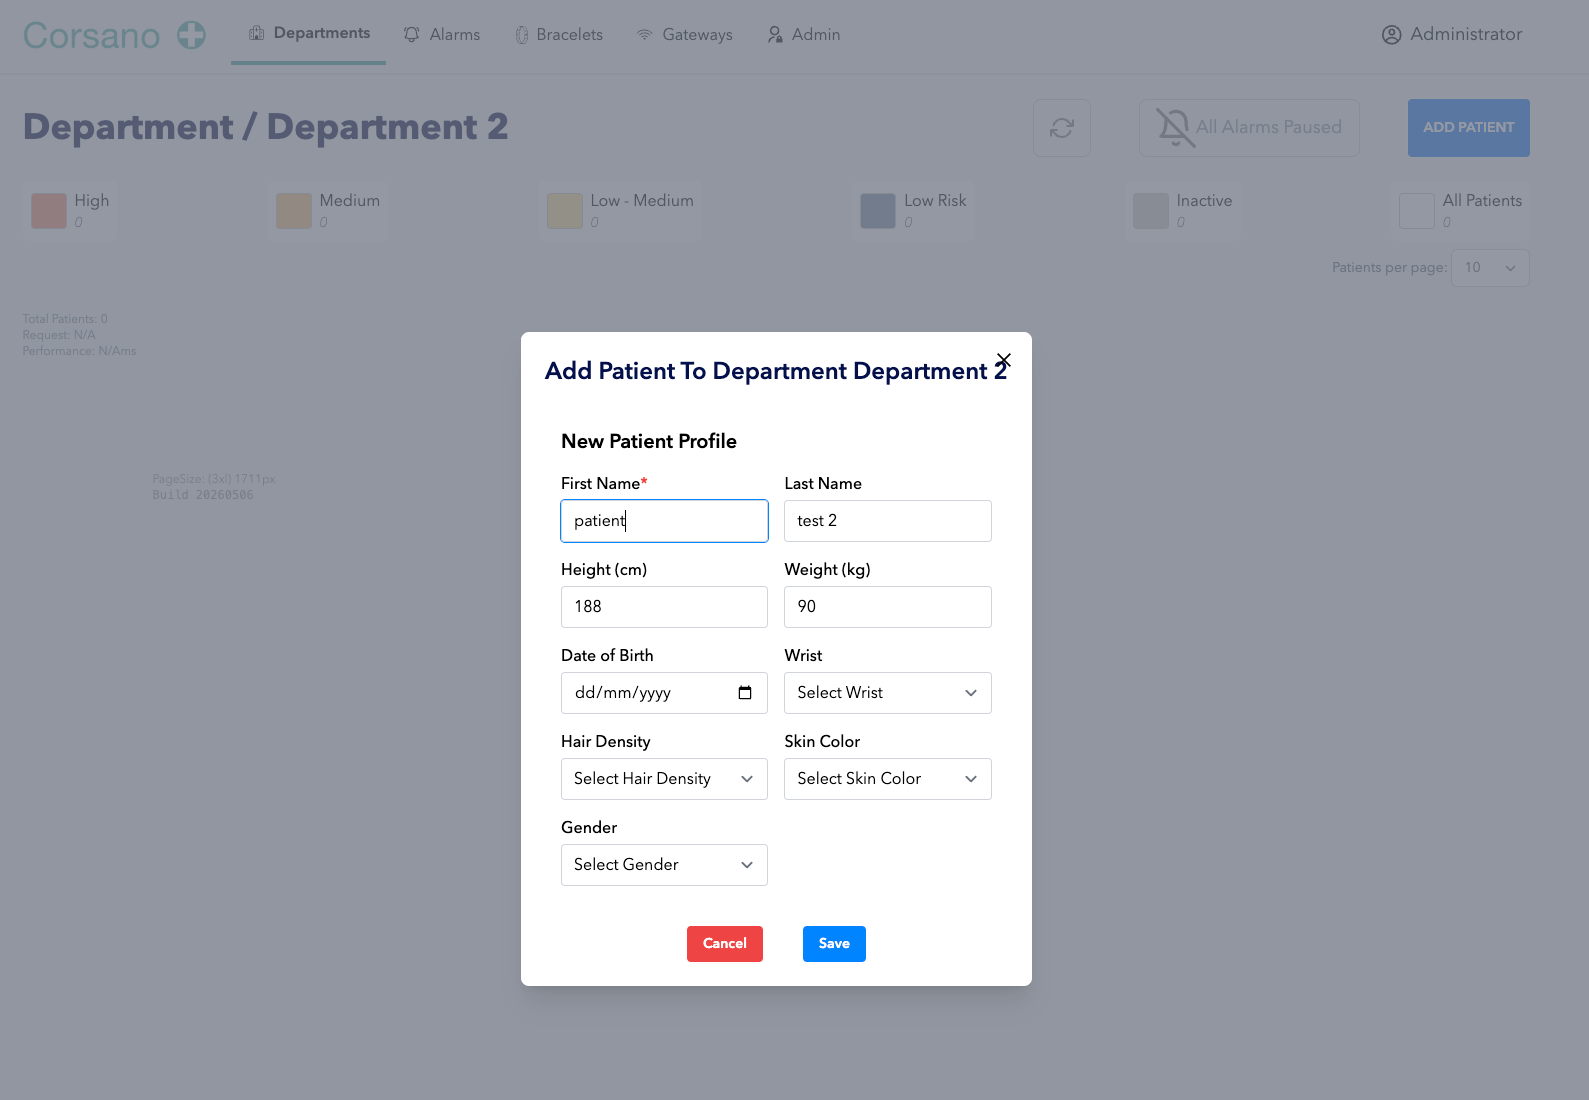
6. Create a Patient under the Study
Open the study and add a new patient. The patient is automatically associated with the study they are created under.
Connect the bracelet: Gateway or Mobile app
From here, the steps depend on how the bracelet sends data to Corsano OnPrem in your setup. Follow the tab that applies to you:
- Gateway: A Cisco or Aruba gateway receives the data from the bracelets.
- Mobile app: The Corsano app on iOS or Android receives the data from the bracelet. You do not need to create a bracelet, sign in to the HCP app, assign the bracelet, or set up a gateway (see steps 7–11 of the Gateway tab).
- Gateway
- Mobile app
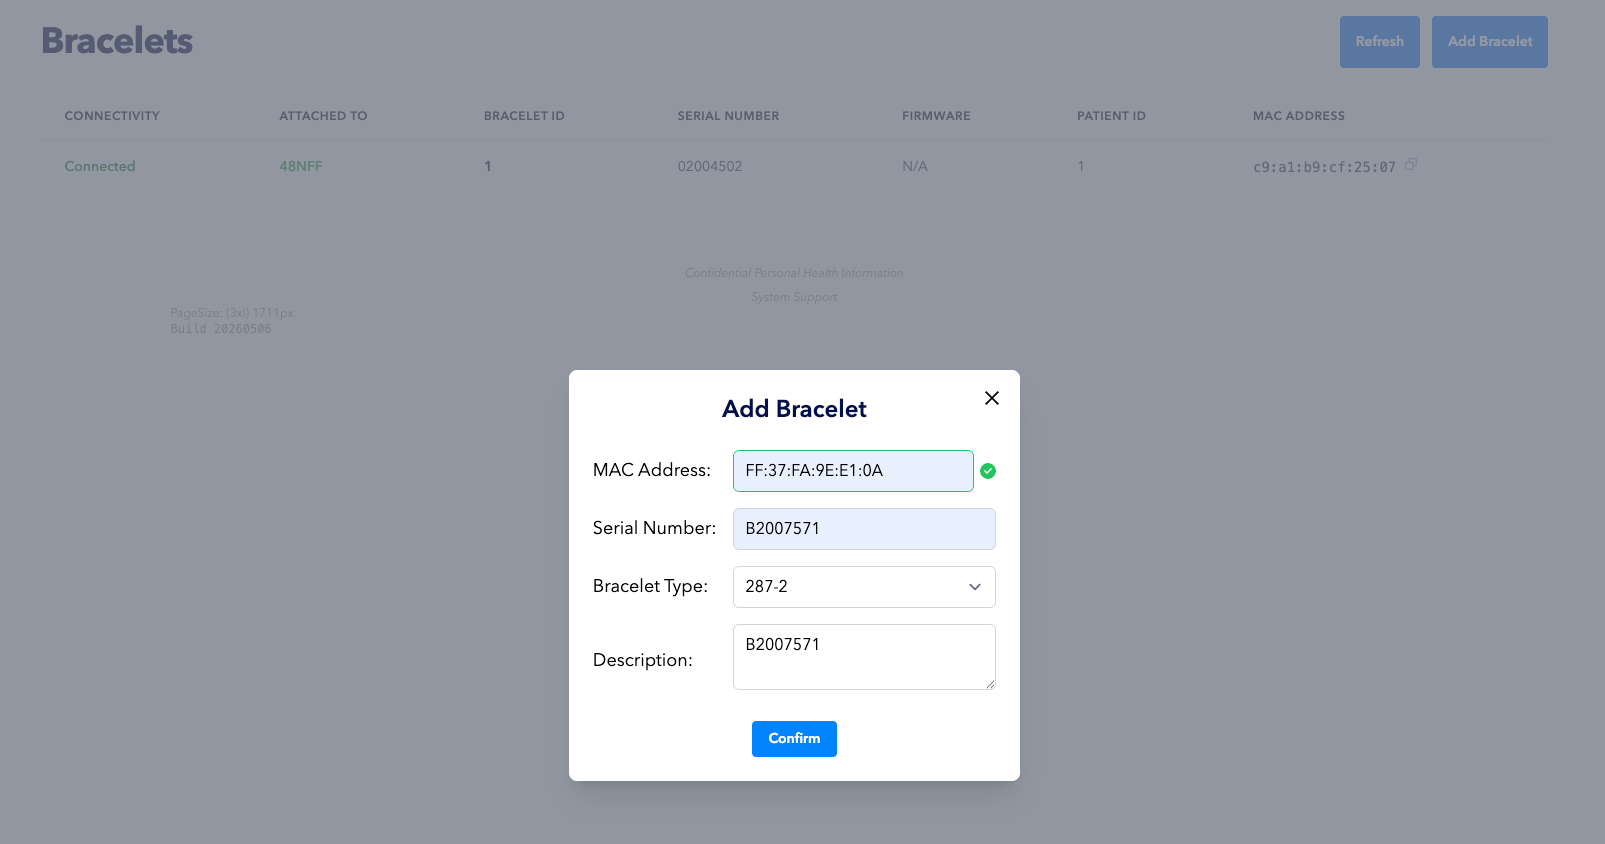
7. Create a Bracelet
In Admin Settings → Bracelets, register a new bracelet using its MAC address. Once registered, the bracelet becomes available for assignment within the system.
8. Sign in to the Corsano HCP app
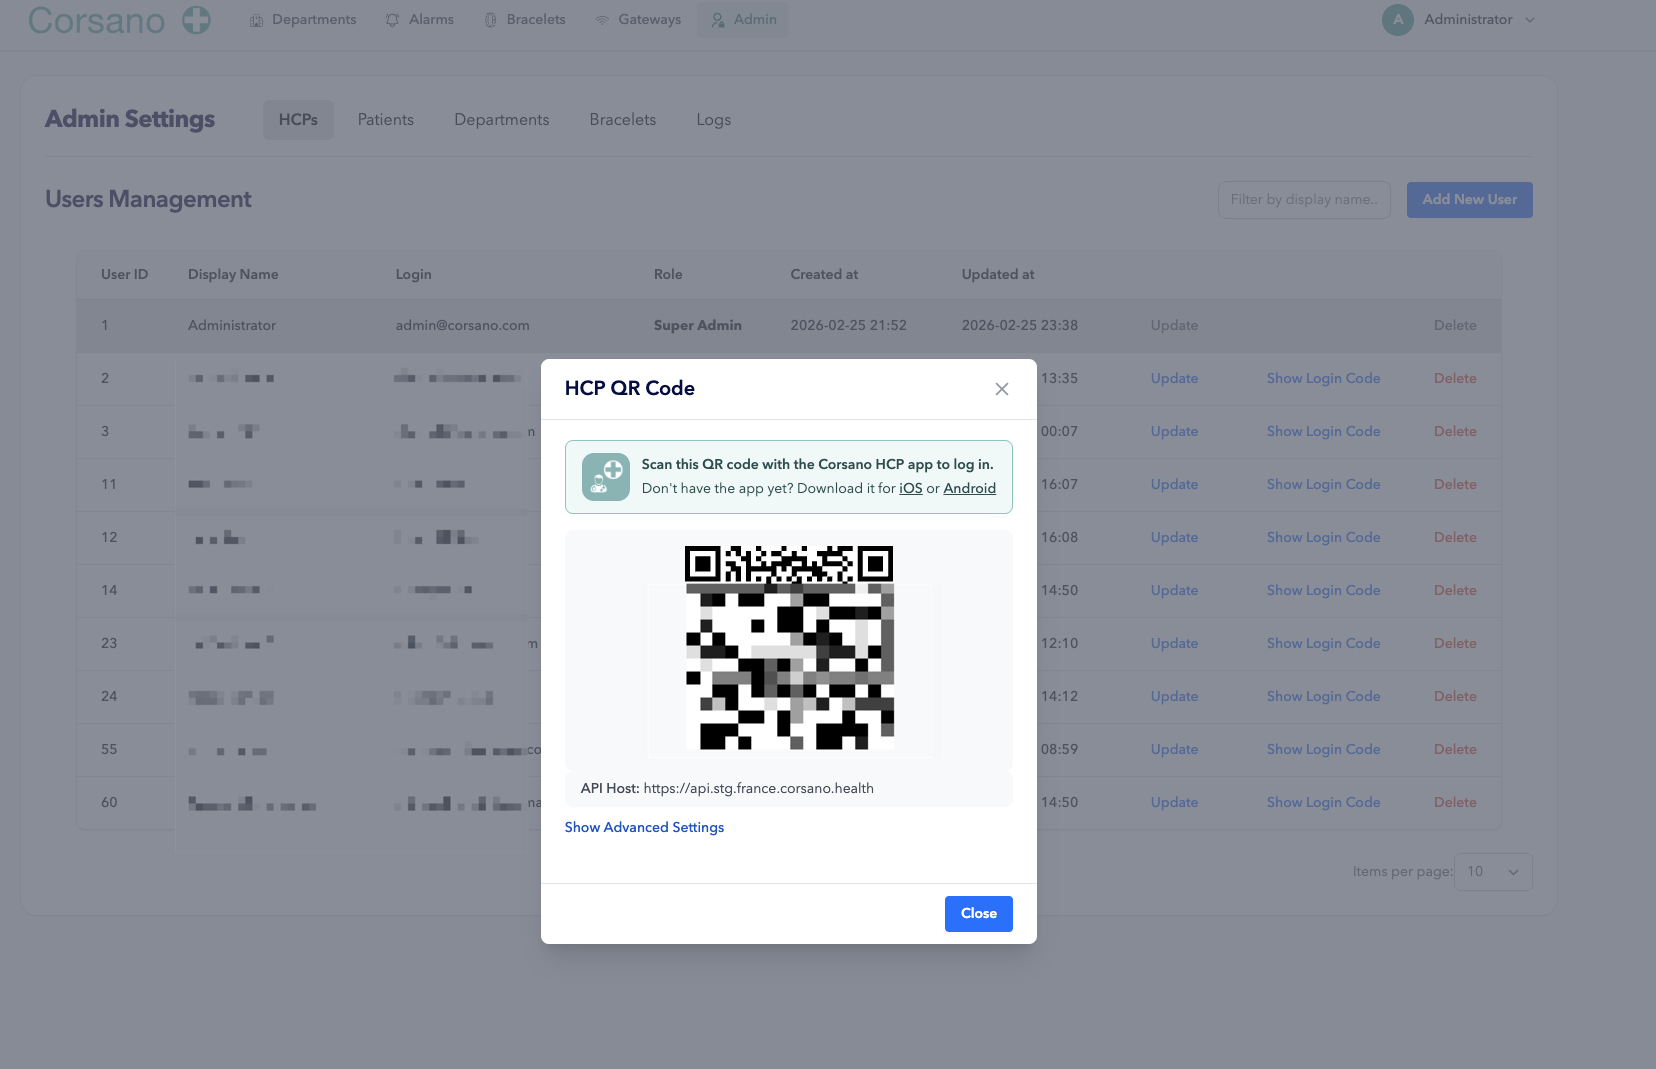
Sign in to the Corsano HCP app as an HCP Admin or an HCP:
- In the web interface, go to Admin → HCPs.
- Click Show Login Code next to the HCP Admin or HCP. The HCP QR Code window opens.
- Scan the QR code with the Corsano HCP app on iOS or Android.
If the Corsano HCP app is not installed yet, download it from the links for iOS or Android in the HCP QR Code window.
9. Assign the Bracelet to the Patient
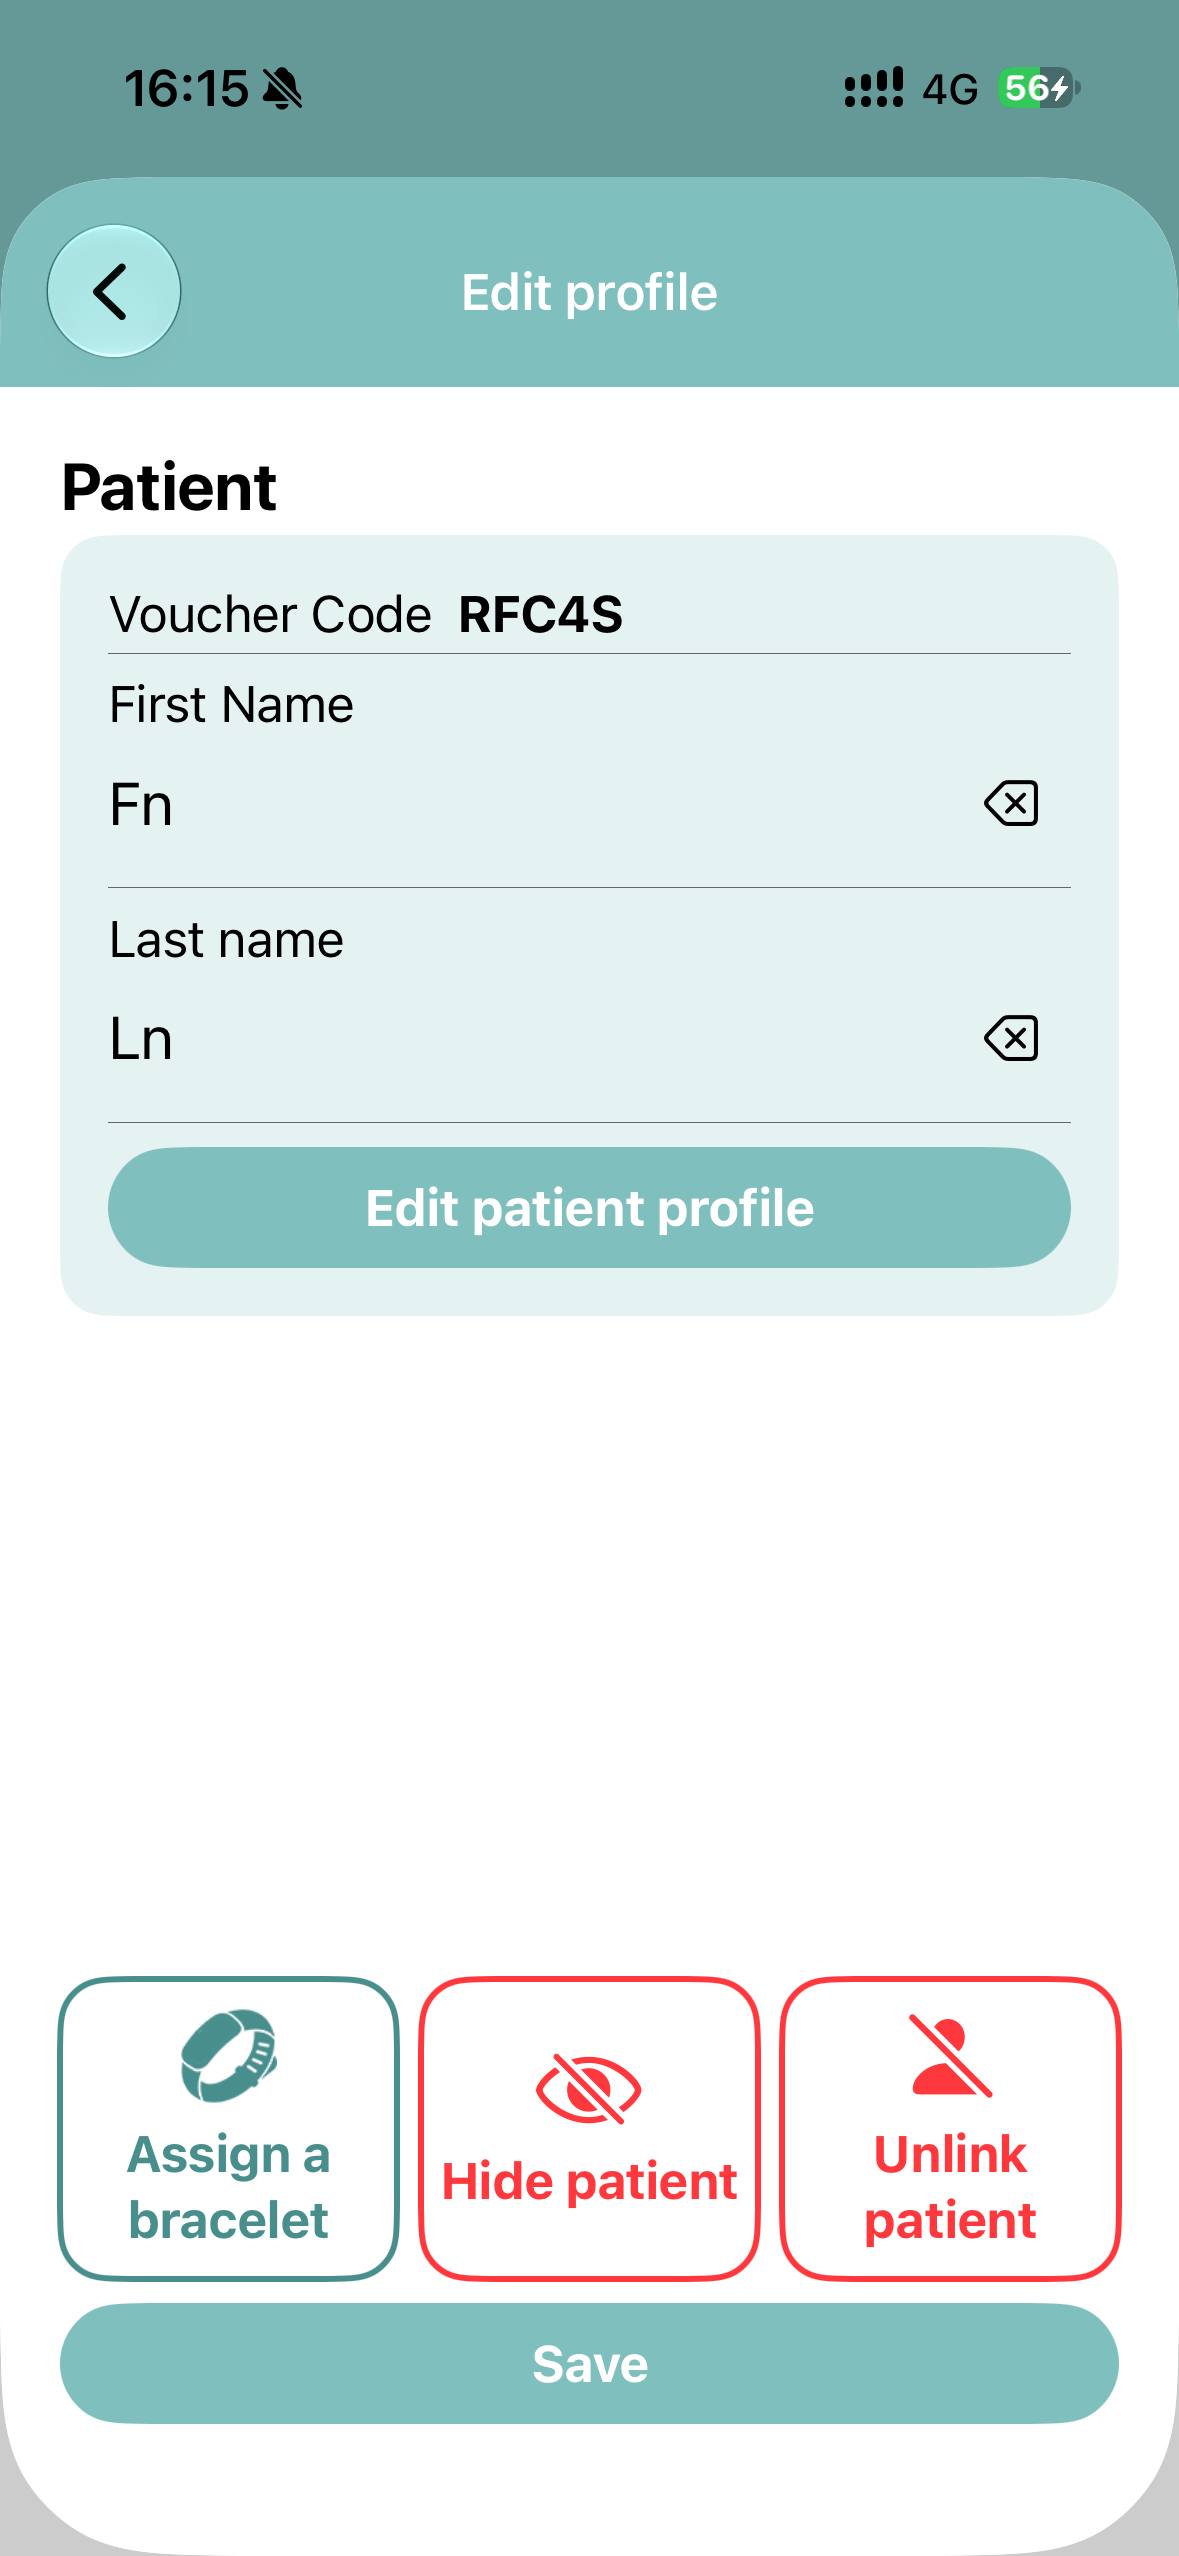
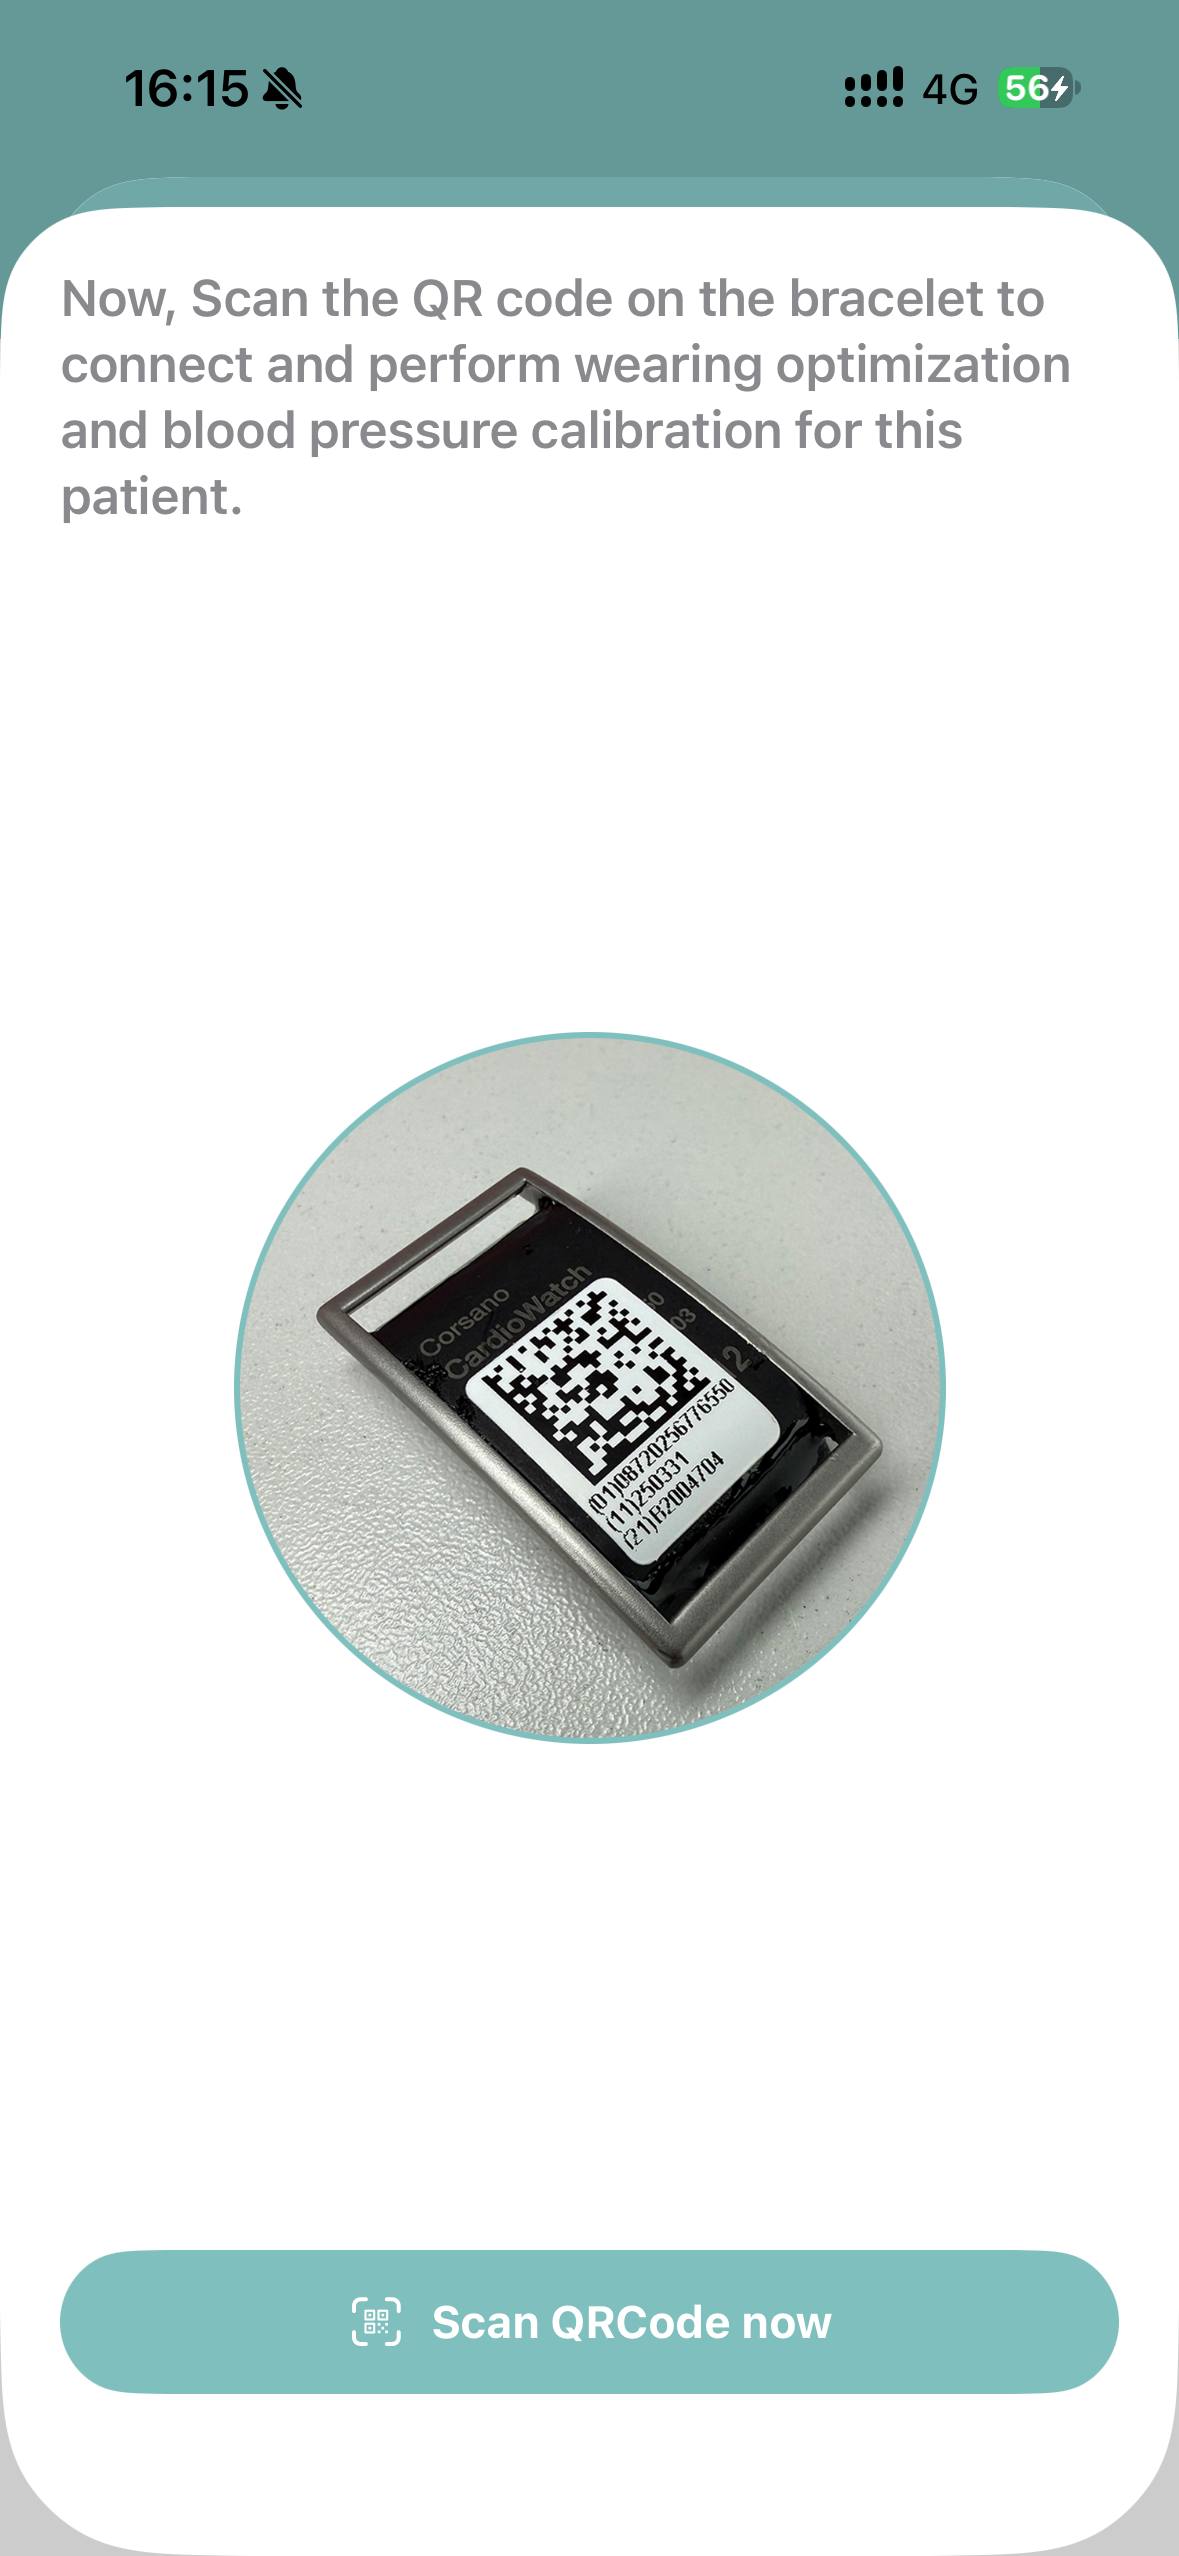
Assign the bracelet to the patient in the Corsano HCP app:
- Open the patient's profile and tap Assign a bracelet (left).
- Tap Scan QRCode now, then scan the QR code on the bracelet or on the bracelet box (right).
10. Add a Gateway and assign the Study to it
Open the Gateways page and add a new gateway (Cisco, Aruba, or IoT Hub). Once created, assign the study to the gateway so the bracelets in that study route their data through it.
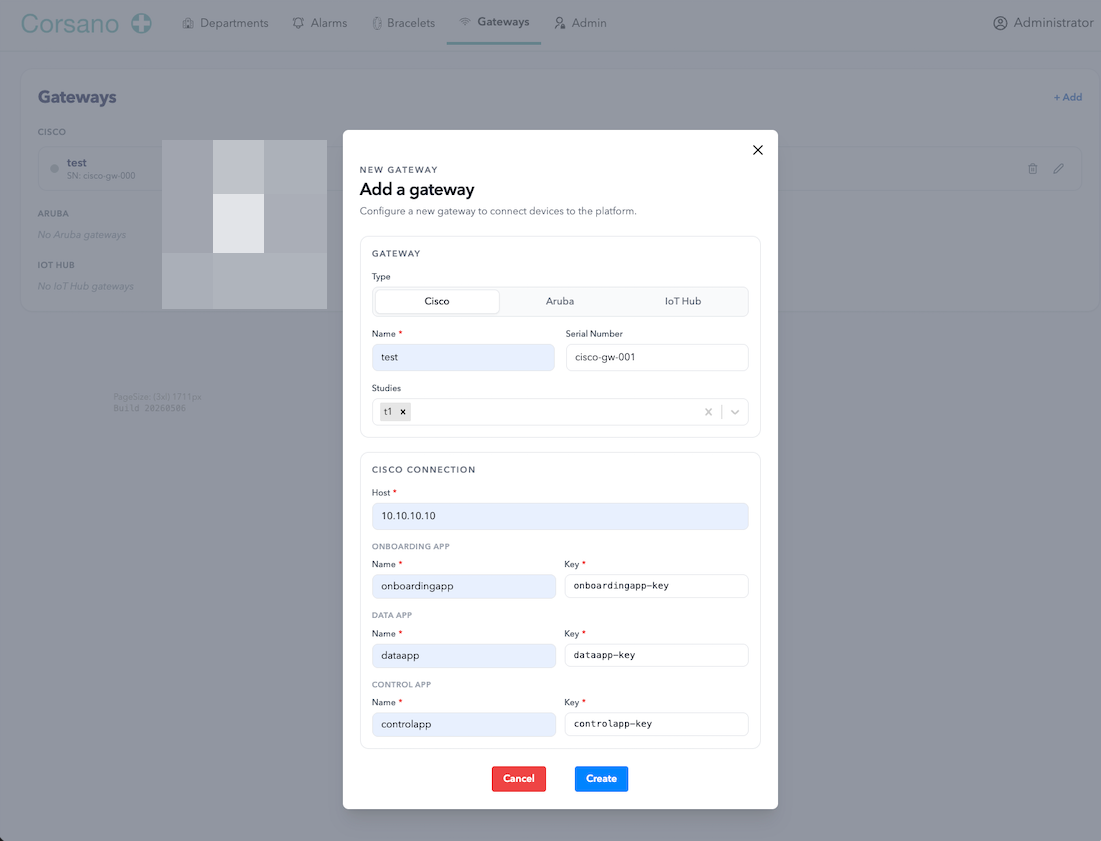
Data flow: Gateway → Studies → Patients → Bracelets
How it works: a gateway is associated with one or more studies. Each study contains patients, and each patient is assigned a bracelet. The gateway listens for data from every bracelet belonging to a patient under any of its assigned studies and forwards that data to the cloud.
11. Start the Gateway app from the terminal
Open a terminal on the gateway host and launch the gateway service using the command below. The screenshots that follow walk through preparing the configuration file and verifying that the gateway containers start successfully.
./start.gateway.sh
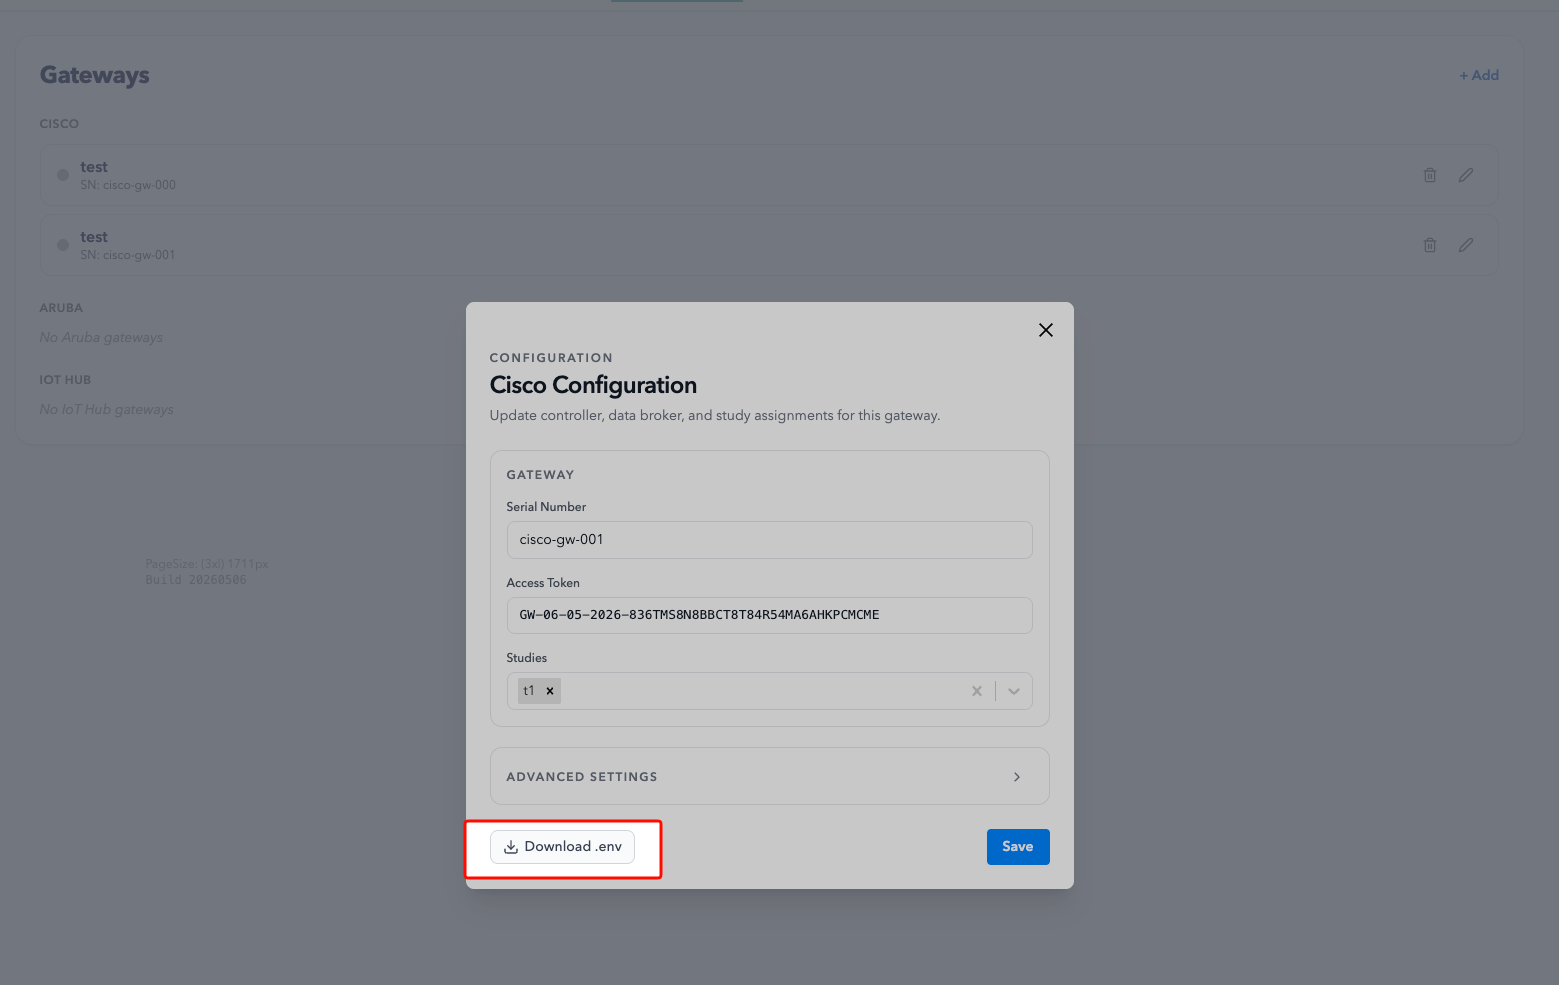
Download the .env file from the portal and place it next to the start.gateway.sh script.
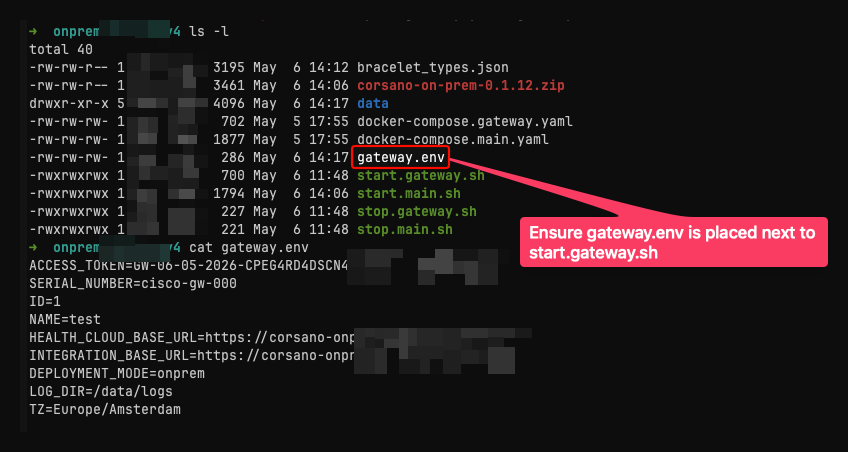
Ensure the gateway.env file downloaded from the portal is present in the working directory.
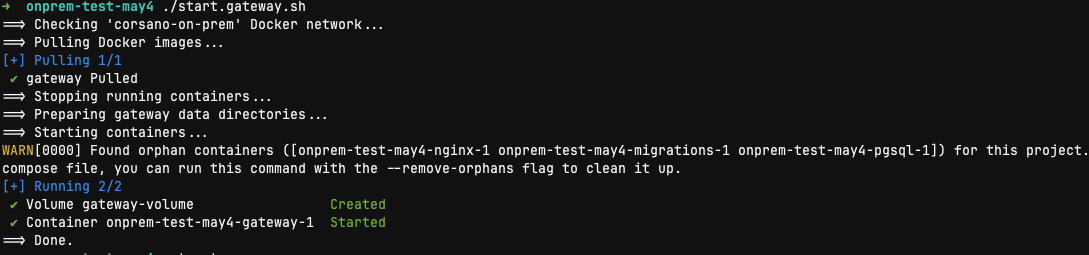
Run ./start.gateway.sh and verify that the gateway containers come up and run correctly.
12. Onboard the Patient using the Corsano HCP app
In the Corsano HCP app (signed in at step 8), open the target patient and complete the onboarding flow:
- Run Wearing Optimization to ensure the bracelet is correctly fitted and positioned on the patient.
- Perform two Blood Pressure calibrations to seed the patient's baseline measurements.
- Disconnect the bracelet from the HCP app, then open the iOS system Bluetooth settings and choose Forget This Device for the bracelet so the gateway can take over the connection.
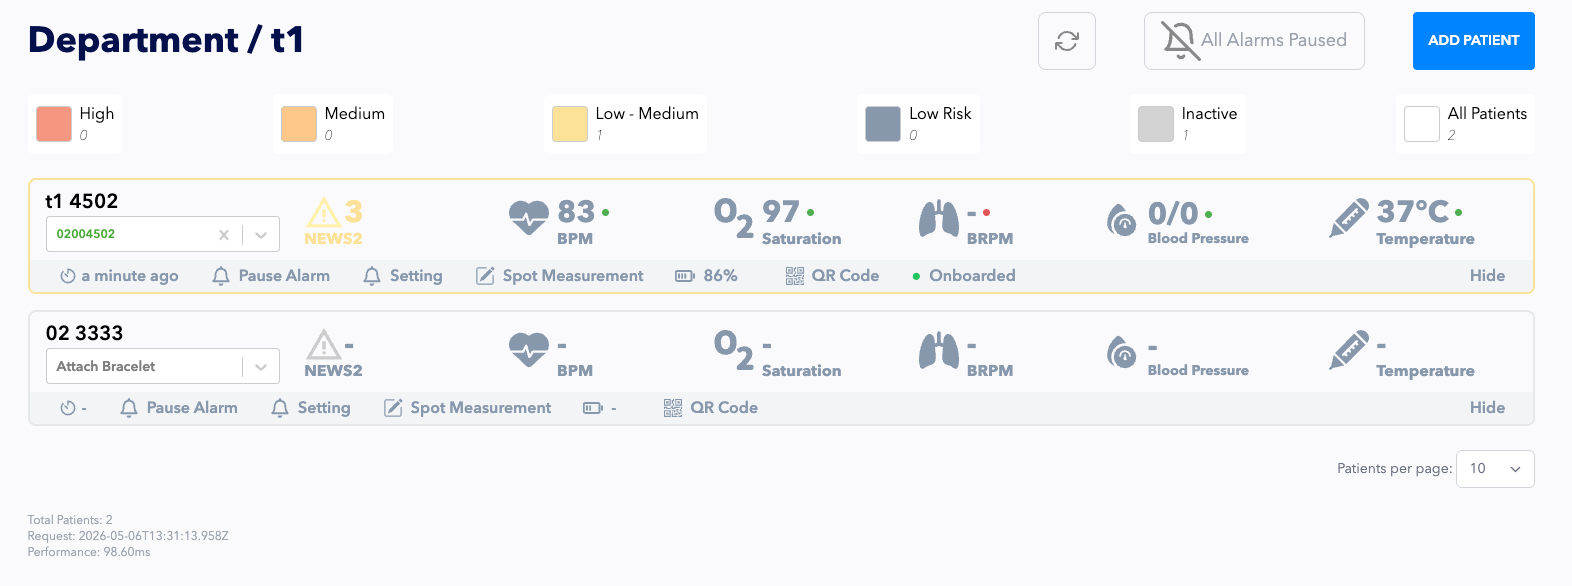
When onboarding succeeds, the patient row in the study view displays a green Onboarded indicator, and the gateway begins establishing its connection to the bracelet.
For a full walk-through, check out the video at Chapter 2: Hospital Onboarding with Cisco.
13. Verify that patient data is streaming
With the gateway running, return to the study in the web interface. Live vitals such as heart rate, SpO₂, respiration, blood pressure, and temperature should begin populating each patient row, and the patient status should transition to Onboarded. If the values remain blank, confirm that the gateway is running and that the bracelet is paired and powered on.
7. Onboard the Patient using the Corsano app on iOS or Android
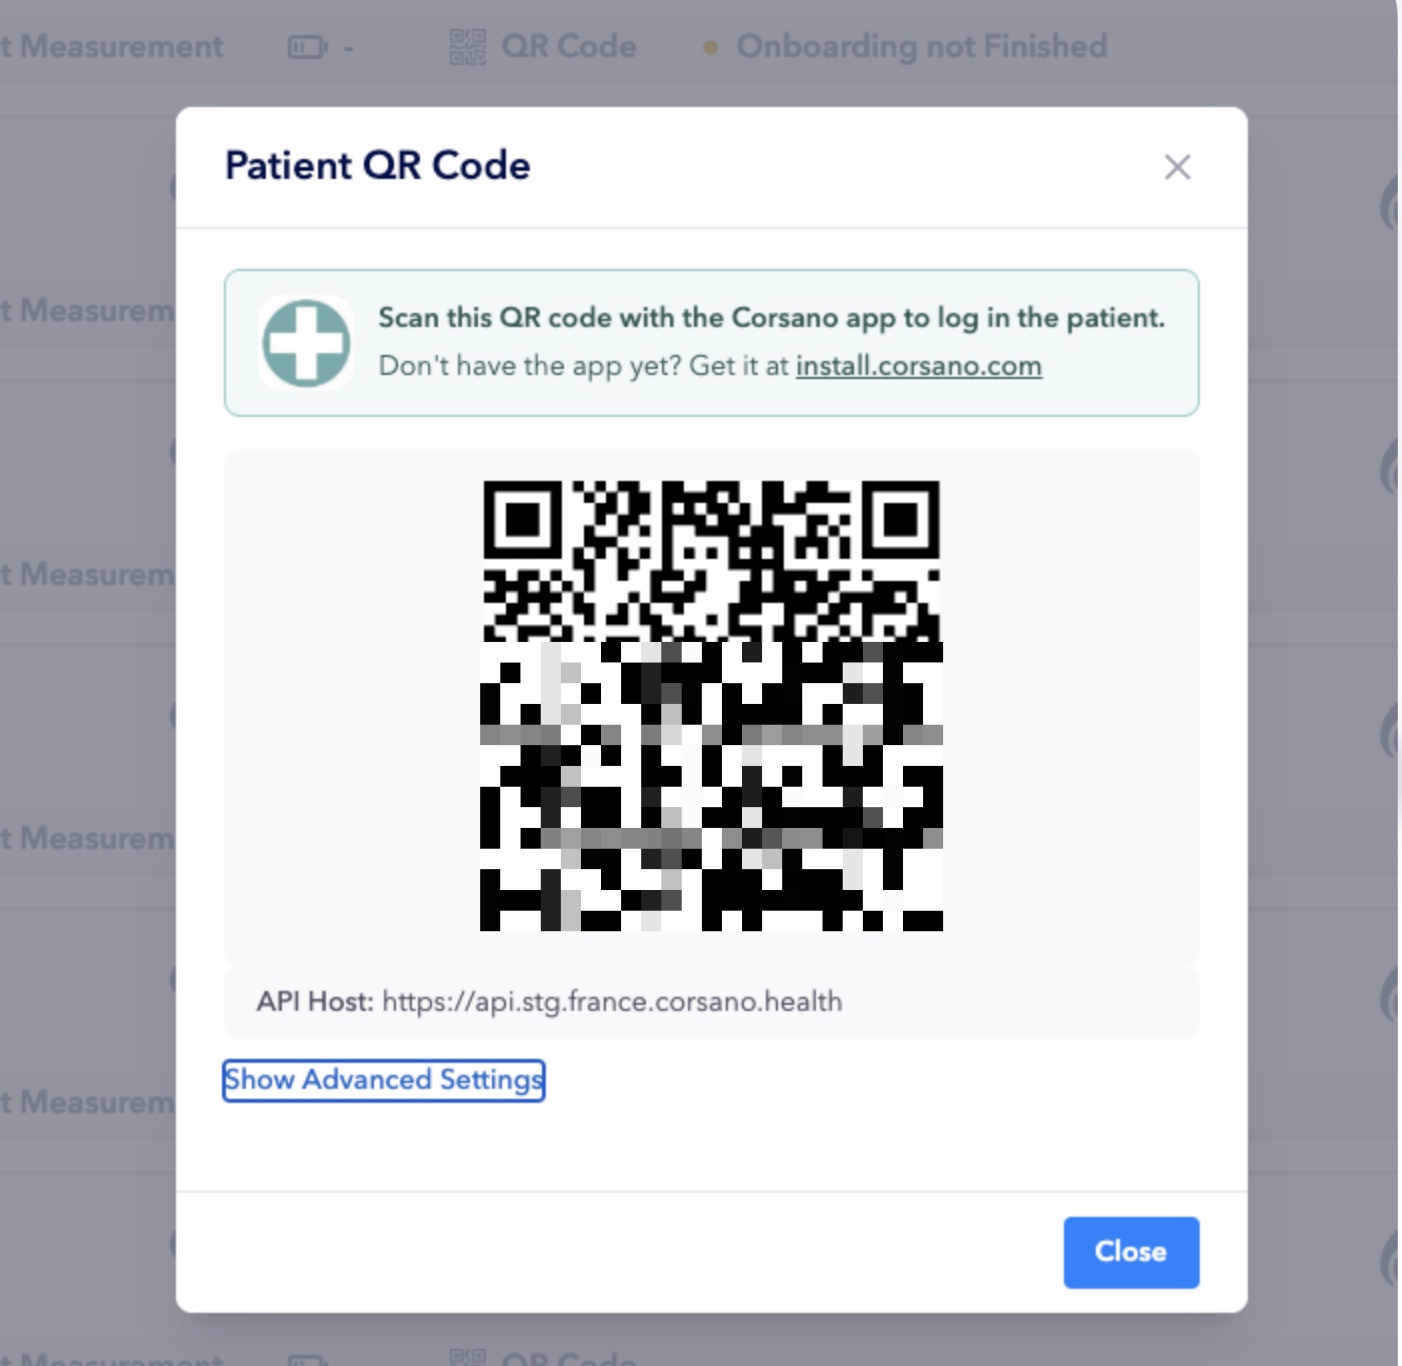
After you create the patient, click the QR Code button under the patient.

The Patient QR Code window opens (left). If the patient does not have the Corsano app yet, they can get it at install.corsano.com.
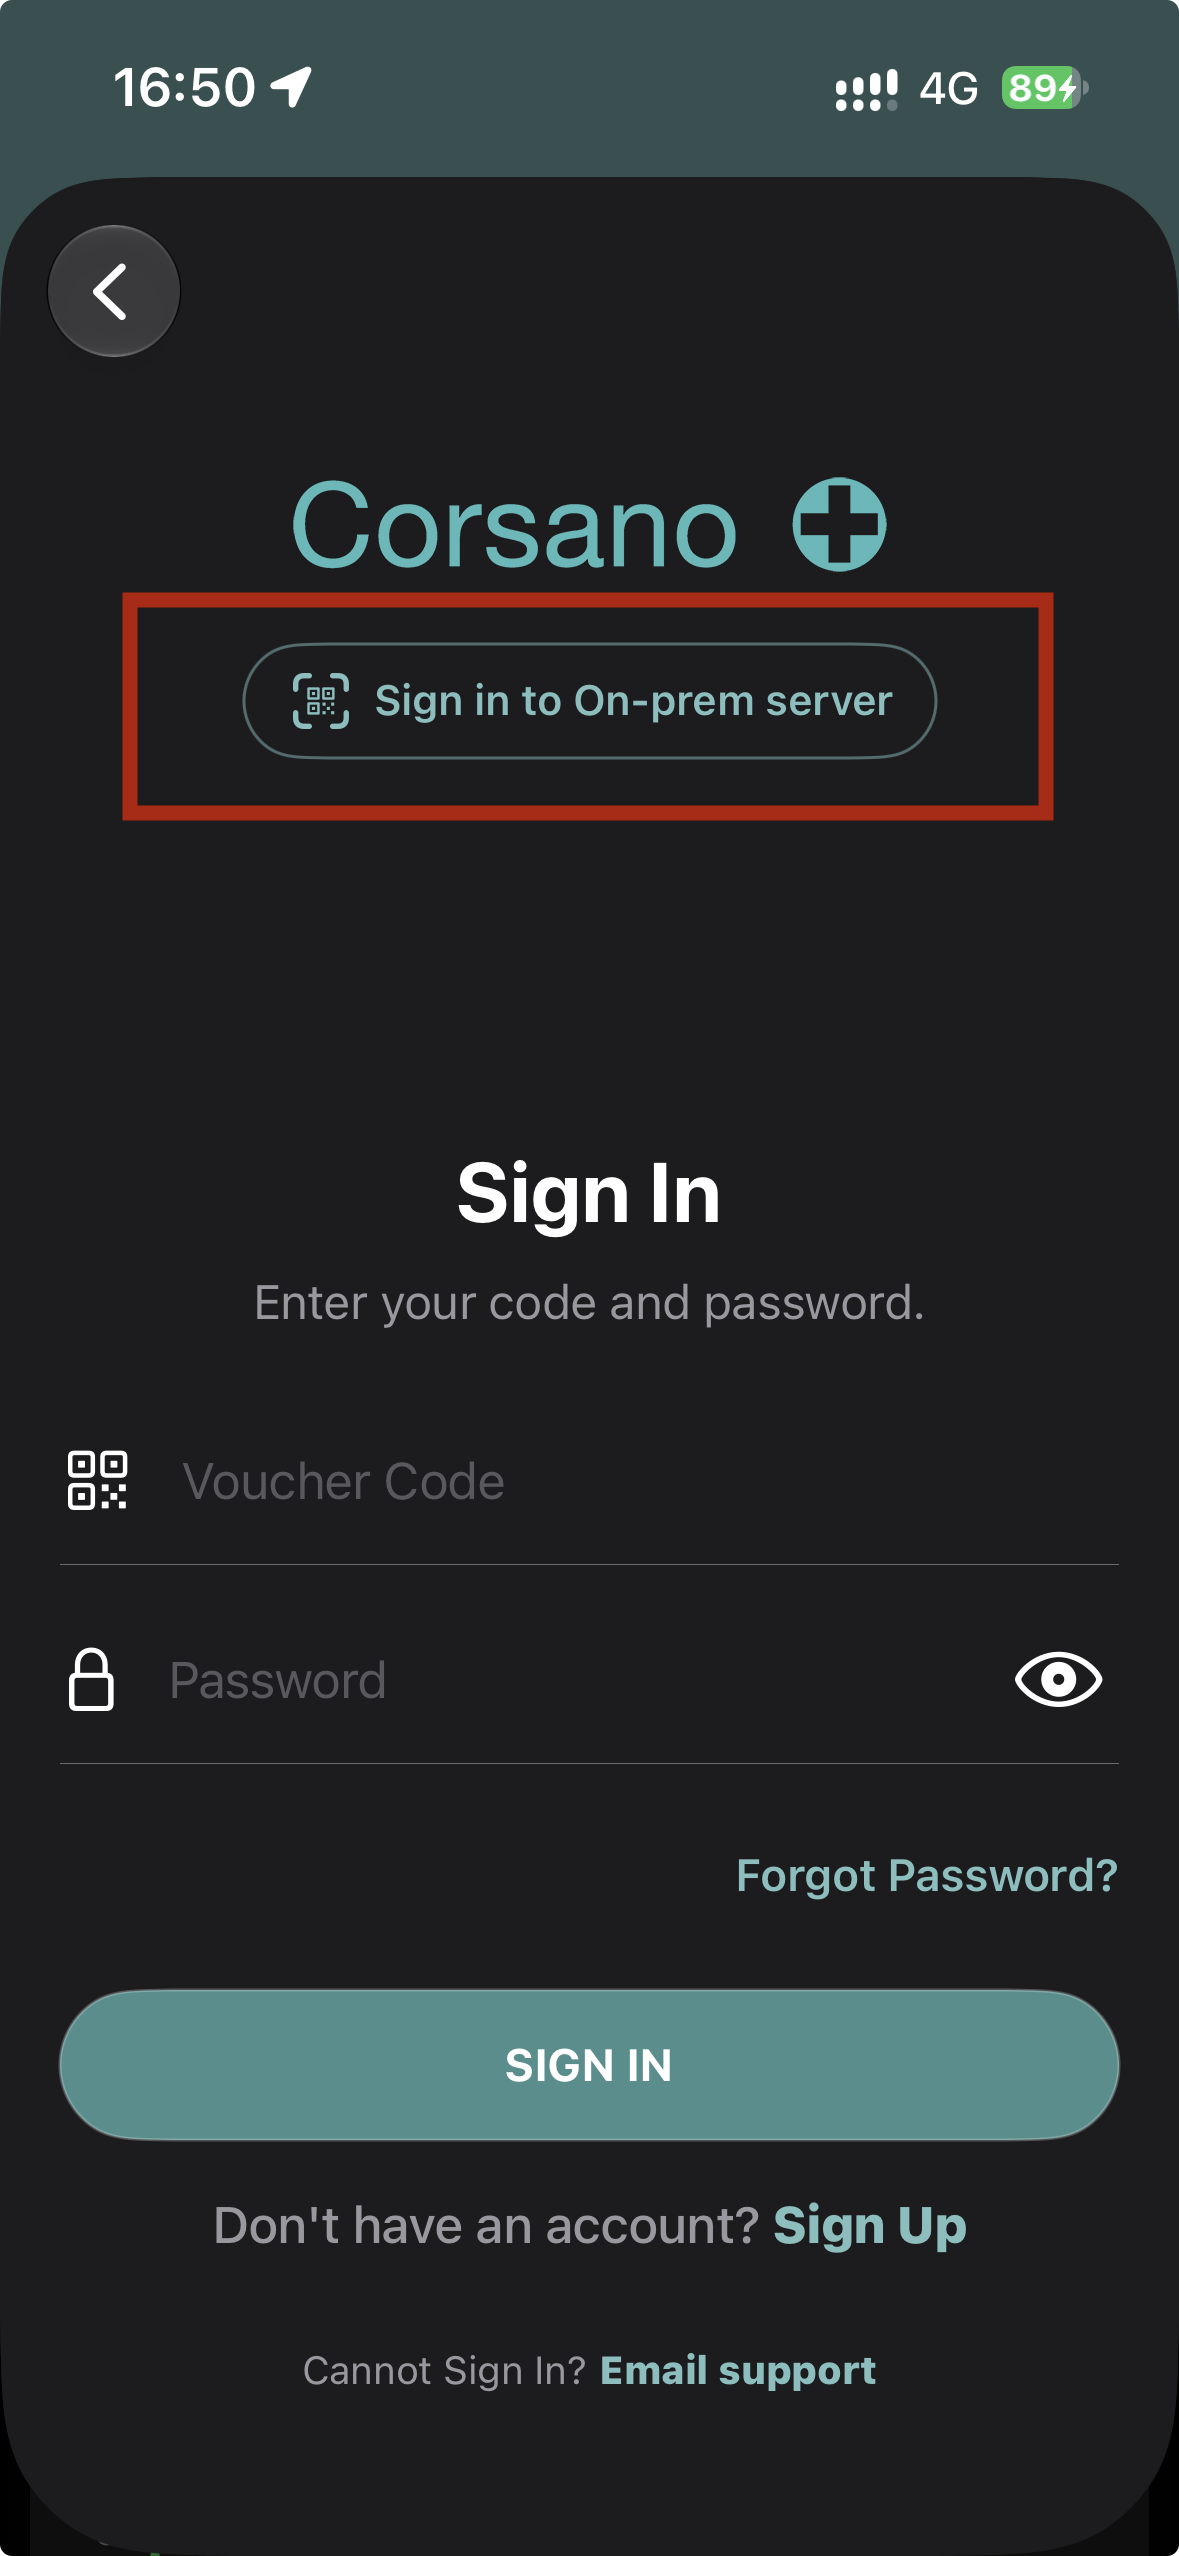
In the Corsano app on iOS or Android, tap Sign in to On-prem server (right), then scan the QR code.
8. Complete the onboarding in the Corsano app
In the Corsano app, complete these steps to get the patient onboarded:
- Run Wearing Optimization to ensure the bracelet is correctly fitted and positioned on the patient.
- Perform two Blood Pressure calibrations to seed the patient's baseline measurements.
When onboarding succeeds, the patient row in the study view displays a green Onboarded indicator.
9. Verify that patient data is streaming
Return to the study in the web interface. Live vitals such as heart rate, SpO₂, respiration, blood pressure, and temperature should begin populating each patient row, and the patient status should transition to Onboarded. If the values remain blank, confirm that the Corsano app is open and signed in, and that the bracelet is connected to the phone and powered on.
Version history
| Date | Change |
|---|---|
| 2026-05-06 | First version. |
| 2026-09-29 | Updated for release 0.1.17. Added SSL certificate setup. Restructured the guide. |
| 2026-10-07 | Updated for release 0.2.0. |